|
IMPORTANT: This light is no longer
available in this form. When you are done reading this
review, you will need to read the
JETBeam JET-I Mk-II review
to see what updates have been made to this light.
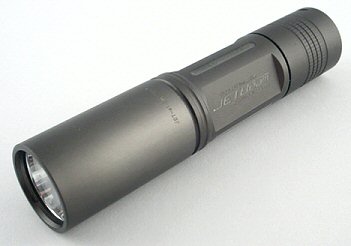
The JETBeam JET-I is a new light from Emilion's Workbench.
This little pocket-rocket is the closest thing you'll
probably come to a completely custom flashlight, because,
well, it is a completely custom flashlight. Designed
to include many great features, it is an amazing little
personal illumination device.
The JETBeam JET-I uses a single 3 Watt Luxeon sitting
behind a sapphire crystal lens with an internal AR coating.
The aluminum reflector has been custom designed to help
with the tint of the light produced by the LED, resulting
in a very white light output. It uses a special boost
circuit that helps regulate light levels and has three
notches around the body filled with glow powder impregnated
epoxy to help you find the light in the dark. Normally
running on a single AA (alkaline, lithium, or NiMH)
you can purchase a 123A tube or an extension to run
the light on 2 AA cells. Even AAA cells can be used
if that is all that is available. A number of accessories
are included with the light as well.
PLEASE NOTE: This is a "small run" light,
which means that it is about as close to a personally-designed
custom-crafted light as you can get without having one
hand made just for you. It was not designed by a huge
manufacturer, but by an individual who wanted to make
an exceptional light, and the parts were machined and
built by a factory that was commissioned to do much
of the work. Some of the work done on the light is "by
hand" by the individual who is making and selling
the light, before being shipped to the consumer. You
may want to consider these to be "pre-production"
lights. Like any piece of machinery that is a new release
from a custom shop, it may need a little TLC and slight
adjustments to make it the best that it can be. Don't
get this light unless you are ready to do a few simple
little tweaks to make it "perfect". More on
this later.
Body:
The body of the JETBeam JET-I is aircraft grade aluminum
with a high quality HA-III natural (gray) finish in
order to give the aluminum a high degree of abrasion
resistance. The two ends of the body tube are different.
The head will only thread on one end, and the tail will
only thread on the other end. They are not reversible.
Also, the O-rings on each end of the tube are a different
color - red on one end and orange on the other. An easy
way to remember which side is which is by using the
color of the O-rings: Red is for the Head.
The head of the light is unadorned except for the unit's
serial number etched around the base of the head. The
body has three flat panels to assist with grip. The
tailcap is surrounded by a box pattern in three rings
which improves grip. The tailcap also has two holes
and an notch. This is for placement of a split ring
through one hole which could then fold into the notch
for standing the light on it's tail. The tailcap switch
is covered with a black textured rubber cap and two
spare rubber caps are included - one red and one orange.
The switch does protrude slightly beyond the tailcap,
making it a little difficult to stand on end. You can
adjust the pressure that the inner switch puts on the
rubber tailcap cover, retracting it slightly if you
are adventurous and want to disassemble the tailcap.
However, this may render your light no longer waterproof
as there will be no pressure on the rubber cover to
keep water out.
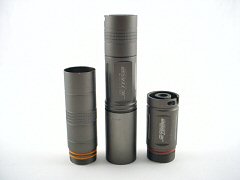
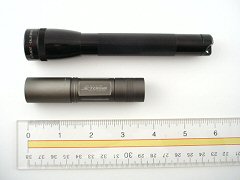
2AA extension tube (Attaches to included AA tube to
allow one more AA); JET-I in center; 123A tube.
1 AA tube and 123A tube in normal light, with lights
out to show glow epoxy on sides
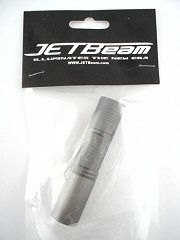
The optional AA extension tube attaches to the end
of the light where the tailcap goes. The tailcap is
then transferred to the end of the extension tube to
create a 2 AA flashlight. The 123A tube replaces the
normal AA tube and tailcap and changes the light from
a click on-off light to a twist on-off. Since there
is no switch on the 123A tube, this results in a very
small light.
Only the standard AA tube and the 123A tube have the
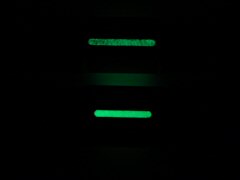
glow-in-the-dark epoxy on the sides. The glowing compound
is harmless and only glows when "activated"
by exposure to light. The glow compound rests in three
grooves around the body of the light. I found that the
AA tube's glow compound had a granular appearance and
was not as bright as the compound on the 123A tube.
About those little "tweaks" I mentioned:
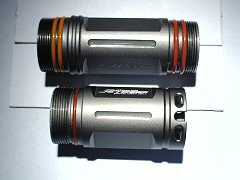
You may note that the AA tubes (both included and extension
tube) have dual O-rings on them. I found that the tailcap
was a real pain to put on and take off of the tubes
unless I removed the outermost O-ring on the end where
the talicap attaches. This makes it much easier to assemble
and disassemble while still maintaining a good degree
of water resistance. This is really a personal preference
issue.
Many users of this light found that there was an advantage
to removing the O-rings and scrubbing the threads with
an old toothbrush dipped in isopropyl (rubbing) alcohol.
There may be a little grit on the threads and this extra
step will make it easier to use as well as help the
light last much longer. If you choose to clean the threads
inside the head and talicap, do so very carefully and
don't allow the alcohol to get inside the electronics.
Keep them tipped open side down and use a bit of cloth
or Q-Tip to clean the threads. Don't forget to lube
the O-rings and threads with silicone grease before
re-assembly. Cleaning the threads is completely optional,
and is a good idea for any new light you get.
Some folks had a problem where the light would not
work upon assembly unless they really screwed the tailcap
on very tight. This is a minor bug that the designer
needs to work out with the factory before their next
manufacturing run. If you do experience this problem,
the fix only takes about 2 minutes to do. What appears
to be happening is that a thin layer of the Type-III
anodize may be coating the exposed aluminum at the end
of the tube. This can be fixed by placing the tube upright
on a piece of 400 grit sandpaper and sanding the very
ends. If you choose to try to do this, it is AT YOUR
OWN RISK (I have to say that so you don't blame me if
you muck up your battery tube). Rub the tube in circles
gently so that the end of the tube is abraded and any
anodize is stripped off. It's best to put the sandpaper
on a flat hard surface to do this work and carefully
rub the flat bottom of the tube in circles on the paper.
When the grit turns into an even field of gray, you
should be done. This work can be done to both ends of
the tube. Be sure to sand just the END of the tube,
not the SIDES or the THREADS.
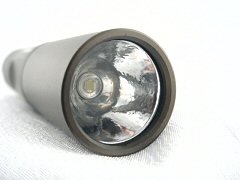
Bezel/Head:
The JETBeam JET-I uses a single 3 Watt Luxeon sitting
behind a sapphire crystal lens with an internal AR coating.
The aluminum reflector has been custom designed to help
with the tint of the light produced by the LED (details
are not being given - trade secret), resulting in a
very white light output. The reflector is textured to
smooth out any imperfections in the beam. The JET-I
head also contains a special boost circuit that helps
regulate light levels and allows the JET-I to operate
on several types of batteries. The circuit is an auto
detect Current Regulated Circuit that will attempt to
regulate the light output when the source voltage is
anything from 4.2 Volts to 0.7 Volts.
4.2v - 3.7v - Direct drive from cells (Drives LED at
something around 4 Watts).
3.7v - 2.2v - Drives LED at 3 Watts
2.2v - 1.0v - Drives LED at 1 Watt.
< 0.7 v - The circuit will continue to draw any current
it can to light the LED
Output: The white light produced by the LED
is exactly that, white. No tint is detectable. Whatever
they did to the reflector to make is help with the light
tint, it must be working. The beam has a bright central
spot with a tapering corona and wide spillbeam. I put
the runtimes to 50% in the chart below for convenience.
Note that the runtimes on two cells is often shorter
than the runtime on one cell.
|
Battery Type
|
|
|
Time to 50% output
|
|
1 AA Alkaline
|
688 (26.23)
|
2200 (22.00)
|
1 hr 18 min
|
|
2 AA Alkaline
|
1200 (34.64)
|
4200 (42.00)
|
1 hr 00 min
|
|
1 AA Lithium L91
|
748 (27.35)
|
2500 (25.00)
|
3 hr 08 min
|
|
2 AA Lithium L91
|
1350 (36.74)
|
4800 (48.00)
|
2 hr 45 min
|
|
1 AA NiMH
|
616 (24.82)
|
2070 (20.70)
|
2 hr 02 min
|
|
2 AA NiMH
|
1135 (33.69)
|
4000 (40.00)
|
1 hr 32 min
|
|
1 123A Lithium
|
1145 (33.48)
|
3430 (34.30)
|
1 hr 08 min
|
All throw readings are in Lux
at one meter. The numbers in parenthesis are for comparison
in the Comparison
Charts.

Beam at one meter at target center.
Runtime Plot:
This time I decided to do the runtimes a little differently.
Here they all are on the same graph, with the graphs
adjusted for initial starting output. Runtimes completed
with alkalineAA, lithium AA, NiMH, and 123A cells:
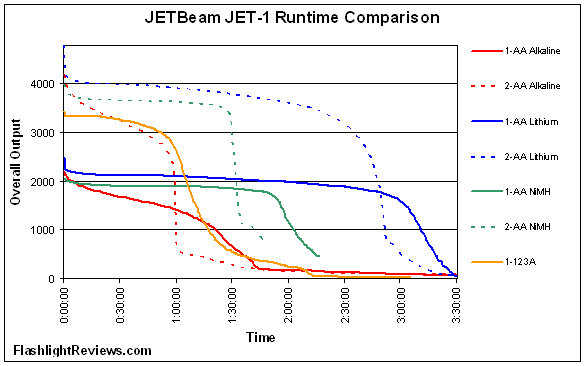
Alkaline
Runtime completed with Rayovac brand batteries.
Lithium AA Runtime completed with Energizer brand L91
AA batteries.
NiMH Runtime completed with Energizer brand 2300 mAh
batteries.
123A Runtime completed with "Titanium"
brand batteries.
More information on runtime plots is available HERE.
Switch:
The switch is covered by a textured rubber pad and
is considered to be a "reverse clickie". Press
until it clicks for on, press gently after "on"
to blink. Press again until it clicks for off. Nothing
else really to report here...
Seals / Water Resistance:
Single or double O-ring seals protect most of the light
and the head is sealed. It should be considered "dunkable"
but is not intended for diving (although some third
parties have reported taking it for a swim in the pool
without any problems.)
If it gets wet inside, just disassemble as much a possible
without tools and let it dry before using again.
Ergonomics:
The triangular profile of the body tube makes it feel
a little weird, but it's hardly worth mentioning. Some
folks using this light have found that the switch is
hard to press, but I did not have any issues with it.
You may need to press in on the switch cap with the
tip of your thumb instead of the pad of the thumb in
order to activate it.
Keep in mind that in use this light will get hot during
use. If you keep your hand wrapped around it, the heat
should not get to the point where it is uncomfortable
since your body's own circulatory system will act as
a heat-pump and move the heat away from the light. If
left in open air for a while and you grab it, it may
scald your hand. Use caution!
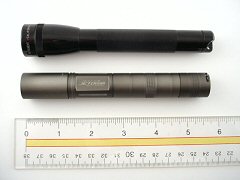
1 AA configuration (standard) compared to a common 2AA
aluminum light
2AA configuration (optional) compared to a common 2AA
aluminum light
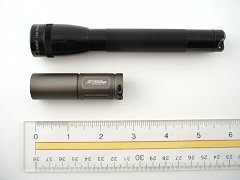
123A configuration (optional) compared to a common 2AA
aluminum light
Batteries:
Utilizing the various battery tubes it can use the
following battery options:
- 1 AA alkaline (AA tube)
- 1 AA NiMH (AA tube)
- 1 AA L91 Lithium (AA tube)
- 1 AAA alkaline (fits in AA tube)
- 1 AAA NiMH (fits in AA tube)
- 1 AAA L92 Lithium (fits in AA tube)
- 2 AA alkaline (AA tube + AA extension)
- 2 AA NiMH (AA tube + AA extension)
- 2 AA L91 Lithium (AA tube + AA extension)
- 1 14500 Li-Ion rechargeable (AA tube)
- 123A Lithium (123A tube)
- 123A Protected Rechargeable Li-Ion (123A tube)
- 123A Unprotected Rechargeable Li-Ion (123A tube)
If using the optional 123A battery tube, I would recommend
Titanium
brand cells for $1.00 each (here's
a review) or BatteryStation
or Surefire
brand cells for less than $2 each. I would not recommend
purchasing these cells at retail stores since they cost
$10 a pair or more in most retail stores!
To change out the batteries: unscrew the tube, drop
out the old cells, place in new cells observing proper
polarity. Reattach the tube and you're ready to go.
Accessories:
Included with the light is a belt pouch for the 1 AA
configuration, a lanyard and two switch covers - one
red and one orange (the red doesn't look that good in
the picture below, but it is very "red").

What I Liked: Water resistant,
Tough HA-III finish, Impact resistant, Regulated, Good
battery life, Bright, Easy battery change, Lightweight,
Lots of battery options.
What I Didn't Like: Nothing.
Picky Little Things: I had to remove
one O-ring from the tailcap end to make installation
of the tailcap easier. Threads needed a good cleaning.
Conclusions: Overall the JETBeam
JET-I an excellent light. Well designed, very bright,
and very versatile. I consider the JET-I to be a premium,
essentially custom, light, and in my opinion it is a
bargain at the offered price. You may need to do make
some very slight adjustments on this first run of the
JET-I.
|


